
You'll need:
- SimPe
- Blender (i'm using version 2.76 though so i'd recommend using this one if you're not familiar with Blender well)
How-to Steps:
1. Open Sims4Studio and find the object you want to convert through the 'Object' button (I've only converted CC (custom content) but when I clicked 'Create 3D Mesh' and 'Standalone Recolor', it took me to the same screen eventually, so you can choose either one of those (You can also name it whatever since you'll be deleting it afterwards -- since you only need the mesh and texture file). If you're wanting to convert an object you downloaded, select 'My Projects' in the main menu and select the object's .package file.

2. When in the item workshop menu, locate the 'Texture' tab and click on 'Export'. Save the file somewhere where you can locate it later (you'll need it in SimPe!)
Also usually there are multiple swatches included so if you'd like to export more than one swatch, then make sure to click on those other swatch(es) and click export as well.

3. Now locate the 'Meshes' tab and click on 'Export Mesh' (If you want the object to have less poly, you can select the LOD (Level Of Detail) tab and choose High, Medium, or Low. Save the mesh file somewhere where you can locate it later (preferably in the same location as the texture file).
Also sometimes more than one mesh is included, so you can export the other meshes too if needed.
Once done with exporting the mesh and texture file, you can now close Sims4Studios and delete the .package you made in the beginning. (If you want to come back to S4S later, then just keep the file in the same location)

4. Open Blender and go to 'File -> Open...' or 'CTRL + O' and open up the .blend mesh file you saved from Sims4Studio (or just double-click the .blend file where you saved it at)

5. You should now see the object on the righthand side of your Blender screen. Sometimes there's a square underneath the object so what you'll want to do is get rid of it (since it'll be apparent in-game in Sims 2) by selecting the mesh layer (it's usually either mesh_0 or mesh_1 or another one). Make sure that the mesh layer is selected and then right-click it and choose 'Delete'.
(You'll know which layer is which, as it'll have an orangish outline around the layer when selecting it)

5.5 This step is for if you want to reduce the polycount of the object if it's too high (it can lag your game). Skip to Step 6 if you don't want to reduce yours.
Select the other mesh layer (for me it's 's4studio_mesh_0') and select the tool icon (🔧) located on the right-side of your screen. Locate 'Add Modifier' and under the Generate column, select 'Decimate'.


I use 'Collapse' when I'm reducing the polycount but there's also other options available if you'd like to test them out. Now hold down and drag the ratio bar left to right while looking at the object and the Faces/Polycount number. You can hold down the scroll wheel in the middle of your mouse and rotate the object to check the object's appearance (since reducing the face count can make things look jagged and 'off'). When you're content with everything, click 'Apply'.

6. When you're finished with everything, go to 'File -> Export... -> Wavefront (.obj)', located at the top left corner.

A screen will pop up showing the file location where you had your .blender file. Make sure the file location is where you want it to be (if it isn't, you can edit it & you also edit the name of the .obj file) and then press 'Export OBJ'.

I usually minimize Blender after exporting the .OBJ file in case I need to go back and adjust the polycount, but if that's not a problem for you, you can just close the app and delete the .blend file.
7. Open SimPe and in the 'Object Workshop' tab, click 'Start' since we're going to be making an object in TS2. Eventually it should show a list of all the object categories. I'll be going with Surfaces > Endtable for mine.
After clicking the second category (Example: mine is 'Endtable'), all of the objects in-game should show up. When you click on each one it tells you the contents of the object down below. You can click on any of them but I try to go as simple as possible and try to go with just Base Game objects. (We're just cloning this object and changing the mesh and texture of it so it's okay if it looks nothing like what you want to convert it as)

8. After selecting the object, click 'Next' in the Object Workshop menu. Under 'Task', you want to make sure you've selected 'Clone'.
Under the 'Clone' tab (with the gear icon), they'll be a list of boxes that are unchecked and checked. If you hover over it, it'll tell you what each one does. Make sure yours looks similar to mine (specifically make sure 'Create stand-alone object' is checked) and click 'Start' or 'Next' when you're ready.
> Some of the things I've checked off is also purely my choice and not needed (EX: Change Description, Pull only default Color, etc). <

8.5 Description box
If you checked off the 'Change Description' box, you should now be at that screen where you can edit the Title, Price, and description of the object. When you're done, click 'Finish'.
9. When you're finished with cloning your desired object, a 'Scenegraph rename Wizard' box will appear. Rename it to something else but only the part I've highlighted down below (so basically before the hyphen (-)). When done with renaming it, click 'Update' and then 'OK'.

10. A pop-up box will appear letting you save the object. This is your official .package file that you'll be putting in game after this tutorial so make sure it's saved in a save place (preferably a folder with the other files you've saved up above). After naming it, click 'Save'.
Now your object has been created <3
So before I get into the next step I want to show you what my SimPe screen looks like and what icons you'll want to make sure is selected to get it to look like mine.


11. In the 'Resource Tree' tab, under 'AllRes', select 'Geometric Data Container (GMDC)'. Now over to your 'Resource List' tab and select the object's modelname you renamed earlier.

11.5 Removing shadow file(s)
Your 'Plugin View' tab should now open up the Generic Rcol Editor. Before I import my .OBJ mesh file, I like to remove the original object's shadows (if you don't see any shadows included, you can ignore this step)
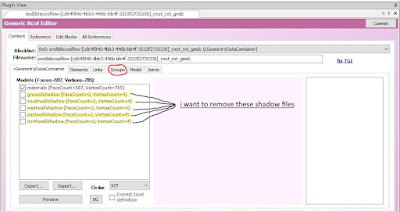
Go to the 'Group' tab within the Generic Rcol Editor in the Plugin View. Now what you want to do is select each shadow in the 'Group Selection' box, and click 'Delete' that's located on the right side of the same box. When done, click 'Commit' that's located on the right-hand side of the Generic Rcol Editor menu.

12. Under the 'cGeometryDataContainer' tab, under the Models box, click 'Import...' and select the .OBJ file we extracted from Blender. Click 'OK'.

13. The Mesh Group Importer menu should now pop up.
If you get a message saying that this file has too many faces/polycount, you'll need to return to Blender and lower the polycount more (make sure to do 'CTRL + S' to save your work just in case SimPe stops working)
Under the 'Group Settings' tab, locate 'Action:' and next to it, select 'Replace'. Now another drop-down box will appear directly below it. Click it and choose the object name (mine is called 'materials'). Now click 'OK' and then 'Commit' in the Generic Rcol Editor menu.

14. Under the 'Resource Tree' tab, under 'AllRes', select 'Texture Image (TXTR)(#)'. Sometimes there's shadow texture files so to delete them you just need to right-click the shadow file located within the 'Resource List' tab. (To view which file is which, just look at the 'Plugin View' tab to view each file.)
14. Under the 'Resource Tree' tab, under 'AllRes', select 'Texture Image (TXTR)(#)'. Sometimes there's shadow texture files so to delete them you just need to right-click the shadow file located within the 'Resource List' tab. (To view which file is which, just look at the 'Plugin View' tab to view each file.)

Select the other texture file (or the 'main' texture file) and, switching over to the 'Plugin View', right-click the image shown and select 'Build DXT...'.

> At the top, right under the 'Plugin View', usually at the end of the object's name, there sometimes is 'base' in the name (indicating which texture is what) <
The 'DDS Builder' menu will pop-up now. Click on 'open Image...' and select your image file. (Sometimes if the texture doesn't look smooth enough I switch to a different format but most times it's fine.) Now click 'Build', and then 'Commit' under the 'Plugin View' tab.
15. Going back to 'Resource Tree -> AllRes -> Geometric Data Container (GMDC)' and then 'Resource List -> [object list name]', select 'Preview' under the 'Export...' and 'Import...' buttons within the 'Generic Rcol Editor' tab. Eventually your new object should show up. Here is mine:

When you're content with everything you see, do 'File -> Save' or 'CTRL + S' to save your .package file.
You can now move the .package file to your Sims 2 Downloads folder (if you have a lot of CC and folders like me you can make a 'testing' folder to see how the object works and looks in-game).
TIPS & QUESTIONS YOU MIGHT HAVE...
- Usually I import my texture files first and then my mesh files in SimPe, since the object preview button is right near where I import the mesh (I just did the opposite in this tutorial for convenience)
- It's good to 'CTRL + S' every once in a while, especially if you plan to close and go back to continue your project.
How do I change my SimPe background color?
At the top of your SimPe screen, go to 'Extra -> Preferences... -> SimPe Settings -> Theme: ' and then choose the style you like best.

How do I change my background color for my Generic Rcol Editor?
Double-click the scroll wheel in the colored box near the middle (mine is light pink). The 'ViewPort Setup' box will appear. Scroll down till you see 'Background Color'. There you're able to change the background when you're viewing your object. (Also turning 'Enable Lights' to 'False' is helpful if the object looks too shiny and you're trying to take a picture (it looks fine in-game, I just do this for preview pics when uploading CC).)

I hope this tutorial helped you learn how to convert S4 objects to S2 <3 Hopefully I make sense and if you find yourself still stuck on something I can try my best to help you...
My other related contact infos are:
Tumblr - @haraspudding2 (main) @harasccfinds (simblr reblog account)
Garden of Shadows - @bunnytommy6
Instagram - @eunhyespoopcore (I post fashion, weird finds, and things I just generally like)
BTW here's some free Simfileshare invite codes in case you want to join to upload your own CC lol (just copy and paste one line):
YldjgKykEIc9q22YGNPWdEZJVHqZVJUh
B3wrDTc1tNzL63CRl5BEjUDuvnHcIGqM
v7wWiEy33tggvtdCTLR6ILcFbPUnu6XW
csMr2u7oWKN3NMWorRqcLwLPCzGuzRsk
lFd7KILiyBTUb4iNXr6bcG7R0zdPEzwN
clGvFw2WX1nft5XFVzmfDUc7iF7njOCO
GPZGzRrERnEGKAPaVtyNsgbJE5xCcZzZ
kuW64u4xao6u2ZRYrHQgoS7BLMTY5Qy3
DcQjHCuHFoCw9ucSR6vBwRBFOj5i8M52
QJFQMJqUPi1LZhG1JRew71KDUwGd8R9D


.png)
.png)
.png)
.png)
.png)
.png)
.png)
.png)


